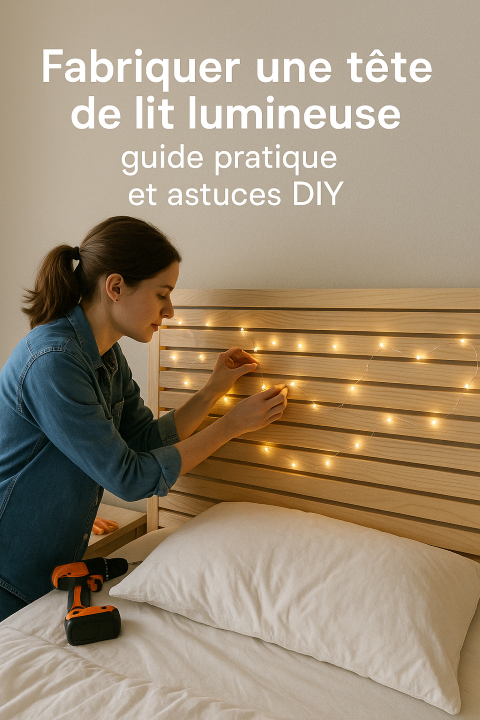
Creating a custom illuminated headboard is an excellent way to add a touch of charm and functionality to your bedroom without dedicating a large budget. Thanks to clever DIY techniques, it is possible to complete this project using various materials such as wood, pallets, or fabrics, while integrating LEDs or string lights for an enchanting effect. Discover how to design an illuminated headboard that will beautify your resting space.
📋 In brief: Personally, I consider making your own illuminated headboard the ideal project to personalize a bedroom, as it allows you to create a unique atmosphere for less than 100 euros. It’s a clever solution that combines furniture and indirect lighting for optimal visual comfort. With a few basic tools and an LED strip, you can radically transform the look of your sleeping area in a weekend.
Choosing the right materials for your headboard
| Element | Recommended type | Quantity | Usage |
|---|---|---|---|
| Wood panel | MDF or OSB (18mm) | 1 panel | Main structure |
| Lighting | LED strip (RGB or white) | 2 to 5 meters | Backlighting |
| Fixing | Wood battens | 4 sections | Wall offset |
| Finish | Paint or fabric | Depending on surface | Final aesthetics |
Before starting the construction, it is crucial to select the appropriate materials. The choice will depend on your aesthetic preferences, budget, and DIY skills. For a natural and rustic style, opting for wood or pallets can be a wise decision. This type of material offers not only sturdiness but also an interesting texture.
If you prefer a softer and more elegant design, consider using fabric. A fabric-covered headboard can bring a certain elegance to your bedroom, especially if complemented by strategically placed LED lights to create a soothing ambiance. Don’t forget to take into account the ease of maintenance of the chosen fabric, particularly regarding stain and wear resistance.
📍 My experience: During my first project in 2024, I attached the LED strip directly onto the raw wood. With the heat, the adhesive came off in just two weeks. The lesson learned is that you should always use an aluminum profile or, at minimum, thoroughly degrease the surface before installation. This small detail ensures that your lighting will stay perfectly in place for years.
Using wood and pallets
(function(){if(window._alpLd)return;window._alpLd=1;var s=document.createElement(‘script’);s.src=’https://cdn.jsdelivr.net/npm/alpinejs@3/dist/cdn.min.js’;s.defer=true;document.head.appendChild(s);})()DIY enthusiasts often enjoy working with wood and pallets because of their versatility. With wooden boards, you can create a sturdy structure for your headboard. Pallets, popular for DIY projects, are well suited for this use. They can be left as is for an industrial look, or sanded and painted according to your tastes.
Battens are also an option. They allow the construction of frames on which you can place light panels or hang a string of lights. Just make sure to choose wood species suitable for indoor use, and feel free to treat the wood to withstand the passage of time.
Create a soft effect with fabric
For those who opt for a fabric headboard, padding will add a luxurious and comfortable look. Use batting or foam to create cushioning before attaching the fabric of your choice. Choose colors and patterns that harmonize with your bedroom for a coherent result.
Riveting is an interesting technique to add stylistic details and firmly attach the fabric to the wooden structure. Also consider combining different fabric textures to enhance the visual effect of the whole.
To go deeper, I recommend discovering the best drill driver brands which are essential for assembling your structure. The guide on which furniture to choose also provides useful tips to harmonize your bedroom. And to go further, how to use a drill offers interesting insights to start your work calmly.
Integrate LED lighting or string lights
🍀 Highlights
- Modern and design look
- Space-saving (no lamps)
- Rewarding DIY project
🔻 Limitations
- Requires a nearby outlet
- Beware of LED heating
One of the key elements of your illuminated headboard is the lighting itself. LEDs are a durable and economical solution, offering soft and welcoming light that is perfect for a bedroom. Installing LED strips is relatively simple; favor adhesive ones that attach directly to the wood or under the fabric.
🌍 Did you know?
Indirect lighting used in a headboard reduces eye strain at the end of the day. Unlike a classic bedside lamp, diffuse light avoids harsh contrasts before sleep.
Diversify your light sources by adding a string of lights around the headboard. You can weave it between the wood grooves or subtly hide it under the fabric to achieve diffuse lighting. The important thing is to ensure an even distribution of light, thus creating a warm atmosphere conducive to relaxation.
Safe installation of the lighting
Always think about safety when integrating electrical components. Make sure to use certified products and follow the assembly instructions provided by the manufacturers. Also plan for a switch that is easily accessible to control the lighting easily without having to get out of bed.
Wireless or solar power supplies can be considered to reduce the use of visible cables and simplify installation. Consult a professional if in doubt to avoid any dangerous installation.
Aesthetic adjustments and finishing touches
Once your illuminated headboard is assembled and the lighting installed, it’s time to proceed with the final touches. Apply a coat of varnish or protective paint if you used exposed wood to extend its lifespan. In terms of aesthetics, consider adding decorative elements such as tufted buttons or colored borders that emphasize the lines of your creation.
Optimize the overall aesthetic impact by matching your new headboard with other textile elements in the bedroom, such as curtains, cushions, or throws. This creates a harmonious and personalized set, highlighting the ingenuity of your DIY project.
Tip to save on materials:
- Look for lots of used wood or pallets in recycled material stores.
- Opt for fabric scraps, often less expensive, available in specialty stores.
- Take advantage of promotions on LEDs and string lights during the holiday season.
💡 Practical tip
For more comfort, install a dimmer or a connected controller. This will allow you to dim the light directly from your smartphone or a small remote control without getting out of bed.
Ensuring strength and durability
Every DIY project must be both aesthetic and functional. Therefore, avoid neglecting the aspects of strength and longevity of your illuminated headboard. If you use wood, make sure to firmly anchor each piece together to ensure optimal resistance. Wood glue and specific screws are essential for a durable fixation.
Besides stability, the headboard must be treated to withstand climatic variations, especially if the light generates heat. A waterproof treatment can protect the material used from the ambient humidity of the room.
⚠️ Common pitfall
A frequent mistake is to fix the LED strip too close to the edge of the panel. The light will then form unsightly bright spots on the wall. Place your strip at least 5 cm from the edge to obtain a smooth and homogeneous halo.
Regular maintenance
Regularly maintain your headboard to ensure its good condition. Frequently dust the wooden surfaces and inspect the electrical connections to ensure they remain properly fixed. LEDs generally have a long lifespan, but check the condition of the bulbs periodically and replace them if necessary to maintain optimal lighting.
Clean fabrics with a vacuum cleaner equipped with a special fabric nozzle to remove dust and prevent your headboard from losing its original shine. Be careful with harsh cleaning products that could damage surfaces or discolor the fabric.
FAQ on making a DIY illuminated headboard
What types of wood are suitable for making a headboard?
Species such as pine, oak, and beech are ideal for building a headboard due to their strength and natural aesthetics. Reclaimed pallets also provide an eco-friendly and economical option for a DIY project. Be sure to treat the wood to protect it against wear and insects.
How to secure the integrated lighting in the headboard?
Make sure to use certified electrical components and follow the manufacturer’s instructions for installation. Install an accessible switch to quickly turn off the lighting. Consider wireless solutions to minimize risks related to poor cable insulation.
Is it easier to use string lights or LEDs?
String lights offer a more diffuse light and are easy to install if you want to create a changing ambiance. LED strips, on the other hand, provide direct lighting and are often more energy-efficient. The choice therefore depends on the type of effect and savings desired.
Can other functions be added to the headboard?
Yes, it is possible to expand the functionalities of your headboard by adding shelves or even built-in USB ports to charge your devices. Each of these modifications enhances practical use while maintaining the aesthetic aspect of your centerpiece.