📋 Key points: Personally, I consider removing a dry cement veil the most thankless but crucial step, as 90% of the final result depends on the sharpness of your joints. You must never scrape dry at the risk of scratching the tile. I always favor a progressive approach, starting with gentle solutions before bringing out the chemical artillery.
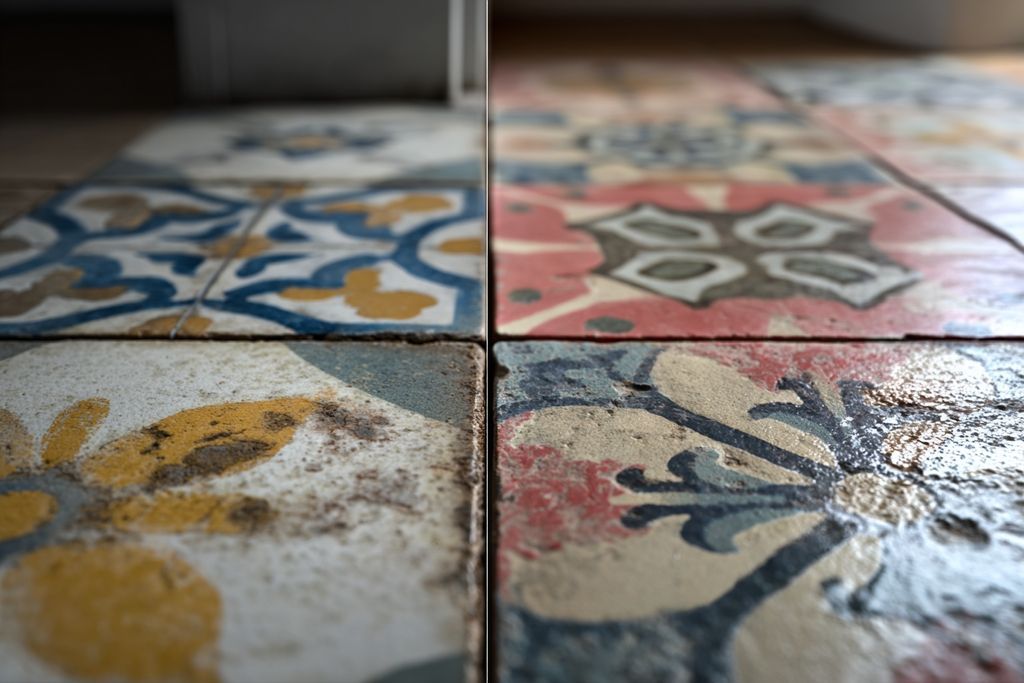
White marks, dry excess or stubborn residues on your new tiles, frustration rises and the fear of damaging the surface sets in. After hours of installation, seeing these marks spoil the aesthetics of your floor or wall can be discouraging. This type of issue affects many homeowners and DIYers, as a poorly removed dry joint quickly turns into a nightmare to erase. Before trying any solution, it is essential to clearly understand the nature of the excess to avoid any irreversible mistakes. The method to adopt varies depending on the condition of the joint and the fragility of the tile: natural products, suitable tools, specific precautions, every detail counts to restore a flawless surface without risking scratches or damage. Following proven steps allows combining efficiency and safety, while preserving the beauty of your covering.
📍 My experience: During my first tile installation in 2024, I let the joints dry overnight without cleaning the excess. The next day, the mortar was as hard as stone and I had to spend 15 euros on an acid stripper to save my living room. The lesson learned is that cleaning with a damp sponge after 20 minutes of installation avoids 3 hours of misery the next day.
How to identify the type of dry joint excess on tiles?
The first step is to observe the nature of the residues deposited on the tiles to choose the most appropriate cleaning method. Some excess appears as whitish marks, others as thicker or grainy crusts. The light scraping test with a fingernail or spatula helps assess the hardness of the dry joint and the ease of detachment.
Recent excess is often removed with clear water, while an ingrained dry joint requires more targeted methods. Identifying the material (cement, silicone, or epoxy) guides the choice of the right cleaning product or appropriate tool. Cement residues are common after installation, while silicone marks are recognized by their elastic appearance.
It is advisable to always test the chosen method on a less visible area to avoid any risk to the integrity of the tiles. Precise analysis of the excess conditions the correct choice of removal technique and the success of the cleaning.
The main types of excess to recognize
- Cement or mortar residues
- Silicone or sealant excess
- Epoxy marks
- Whitish deposits (cement veil)
- Accumulation of dust related to the dry joint
To go deeper, I recommend reading our guide on laying tiles like a professional. If you need to make adjustments, knowing how to cut tiles also provides useful tips. And to go even further, using a tile cutter sheds interesting light on the essential tools for the job site.
Which natural methods to choose for gentle and effective cleaning?
🌟 The advantages
- Perfect aesthetics of the joints
- Eliminates tile dullness
- Facilitates future maintenance
⚡ Weak points
- Physical and lengthy work
- Risk of digging into the joints
The use of natural products guarantees a gentle cleaning of the tiles without risk of scratching or damage. Diluted white vinegar or baking soda form an effective combination against most dry joint residues. Apply the solution to the affected area, let it act for a few minutes, then gently scrub with a damp sponge.
To enhance the removal of excess, it is possible to combine white vinegar and baking soda. This effervescent reaction dissolves deposits without damaging the tiles. It is always advisable to rinse thoroughly after cleaning to avoid any residual marks.
These natural methods are perfectly suited for delicate or old tiles, and limit the use of chemical products. They offer an economical and environmentally friendly solution for the removal of dry joint residues.
🌍 Did you know?
Citric acid, often used to remove cement haze, is present in lemon juice at about 5%. It is a powerful ecological alternative that dissolves mortar residues without releasing toxic fumes harmful to your lungs.
Steps for successful natural cleaning
| Product | Type of excess | Expected action | Scratch risk |
|---|---|---|---|
| White vinegar | Light haze | Calcium deposit dissolution | None |
| Hydrochloric acid | Large dry patches | Chemical attack | Low |
| Joint scraper | Thick layer | Mechanical action | High |
| Clay stone | Matte marks | Gentle polishing | None |
- Dilute white vinegar in warm water
- Apply on the dry joint excess
- Let sit for 10 to 15 minutes
- Scrub with a soft sponge
- Rinse thoroughly with clear water
Which tools and techniques to remove embedded dry joint excess?
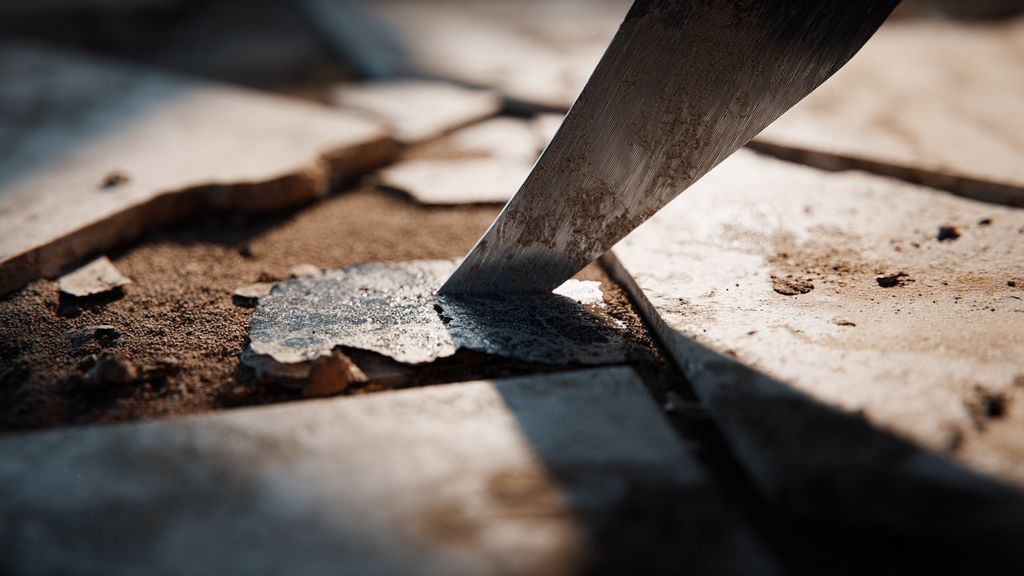
Mechanical removal is necessary when the excess of dry grout resists natural methods. A special tile scraper or a thin blade allows you to lift the residues without scratching the surface. Using a wire brush on a drill is suitable for sturdy tiles, but should be done carefully to avoid any damage.
For fragile surfaces, a plastic spatula or a soft abrasive sponge offers a good balance between effectiveness and respect for the tile. Heat, generated by a hairdryer or a heat gun at low temperature, softens certain residues and facilitates their removal by light scraping.
The intervention should always be done with slow and controlled movements to preserve the shine and cleanliness of the tile. Regular monitoring of the condition of the dry grout during the stripping limits the risk of mistakes.
⚠️ Common mistake
The most common mistake is using a metal spatula or a screwdriver to scrape. This leaves indelible gray metal marks on the tile’s enamel. Always use plastic or wooden tools for mechanical actions.
Recommended tools for controlled stripping
- Special tile scraper
- Thin blade or cutter
- Soft wire brush
- Suitable abrasive sponge
- Hairdryer or heat gun
How to ensure safety and preservation of the tile during stripping?
The use of chemicals for stripping the excess of dry grout requires increased vigilance. Strict adherence to the manufacturer’s instructions, wearing gloves, goggles, and a mask, as well as good ventilation of the room ensure safety during cleaning. Rinsing with clear water neutralizes any corrosive residue.
Some tiles or grouts are sensitive to acids or solvents. A preliminary test on a less visible area prevents any risk of dulling or alteration. Patience and regular observation of the result guarantee a gradual and controlled removal.
The combination of several techniques (natural, mechanical, thermal) optimizes the removal of residues and preserves the quality of the tile. Adapting the method to the hardness of the dry grout and the fragility of the support remains the key to a successful cleaning.
🔧 Tip
For very stubborn grouts, soak a microfiber cloth with a 50/50 mixture of hot water and household alcohol. This helps to lift the milky film that sometimes persists even after several rinses with clear water.
Tips for a safe and effective intervention
- Carefully read the instructions of chemical products
- Wear gloves, goggles, and a protective mask
- Ventilate the room during and after the stripping
- Rinse the tiles thoroughly after each step
- Check the compatibility of the products with the surface
On a recent site, a simple test with white vinegar saved a high-end tile from traces of dry grout without any damage.
How to prevent the appearance of dry grout surplus during tile installation?
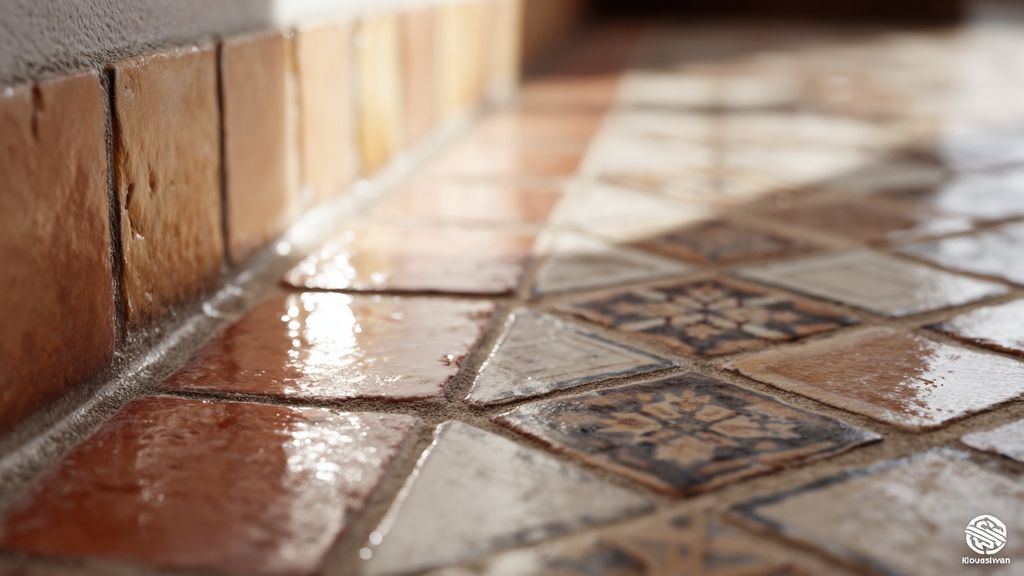
Prevention starts from the preparation of the site. Using a suitable rubber squeegee and regularly cleaning the surface during installation limits the formation of surplus and residues. Precise application of the grout, followed by immediate wiping of excess with a damp sponge, greatly reduces the presence of dry grout on the tiles.
Working in small areas and respecting the recommended drying time allows intervention before the grout becomes too dry. Careful visual inspection at each step ensures quick removal of traces and facilitates the final cleaning. Mastering the technique protects the tiles and avoids heavy stripping interventions.
Surplus condition
Posé depuis moins de 1h Sec (posé hier) Très sec (plusieurs jours)Surface à traiter (m²)
Moins de 10m² 10 à 30m² Plus de 30m²Méthode recommandée
Choose the right type of grout to limit removal difficulties
The choice of grout depends on the type of tile and the room’s use. Some modern grouts, designed for easy removal, simplify the cleaning of surplus. Opting for a suitable product reduces the risk of hard-to-remove residues and protects the surface during stripping.
Adapt the method according to the tile texture
Tiles with a smooth surface retain less surplus than textured or porous models. Using temporary protection, such as plastic film, prevents the embedding of dry grout. Adapting the installation and removal technique according to the texture ensures effective cleaning and preserves aesthetics.
The importance of intervention timing after installation
Quick cleaning, right after installation, prevents the grout from hardening and facilitates the removal of surplus. The longer the wait, the more the dry sets in, making stripping laborious. Respecting this timeframe limits the appearance of persistent residues.
Mistakes to avoid to preserve the tiles
Using inappropriate tools, such as a metal blade that is too hard, can scratch the tiles during removal of the surplus. Neglecting rinsing after cleaning promotes the fixation of residues. Favoring gentle gestures and appropriate equipment ensures the durability of the covering.
- Prepare tools and materials before installation
- Work in small areas to control drying
- Immediately wipe off excess grout
- Use products suitable for the type of tile
- Perform regular visual checks during installation
What is the best time to intervene on excess dry grout?
A quick intervention, as soon as the grout begins to dry but is still slightly soft, simplifies the removal of the excess. This timing limits the use of aggressive stripping methods and preserves the quality of the tiling. Regular observation of the drying progress allows action at the optimal moment for effective cleaning.
Anticipating the appearance of stubborn residues reduces the effort needed for elimination and prevents surface damage. Good site organization, combined with precise actions, ensures a clean and lasting result. Taking the time to check each step remains the best guarantee to keep the tiling flawless.
“Regular and careful maintenance makes all the difference in preserving the beauty of the tiling.”
FAQ on removing excess dry grout from tiling
The cement veil appears as a very light whitish film, especially visible in raking light, and is easily removed with specific products or diluted vinegar. An embedded dry grout surplus, on the other hand, forms a thick or grainy crust, often perceptible to the touch and requiring tools or mechanical methods for effective removal without damaging the tiles.
Yes, it is still possible to restore old tiles marked by dry grout even after several years. The intervention requires more patience and sometimes alternating natural, mechanical, and chemical techniques adapted to the fragility of the covering. Testing on a small, less visible area allows assessing the tile’s reaction before extending the cleaning to the entire surface.