Plasterboard sheets are among the most commonly used renovation and construction materials. Despite their many advantages, they can prove to be less strong and less durable. Over time, they may develop possible cracks.
To proceed with their repair, calico tape application is essential. If you are not used to using it, this article is very useful. Discover the key points to remember about calico tapes or plasterboard tapes.
What is calico and what is it exactly used for?
To repair the wall or the plasterboard ceiling, the term calico has been heard several times. However, one does not really know what this material consists of.
Originally, it is a cotton fabric that was previously used in sewing. But in the building field, we mainly talk about calico tapes.
This element is defined as plasterboard joint tapes or joint tapes for plasterboard sheets used to make the joints of BA13 sheets. It is thus used to make the junction between the two panels and prevents this connection from being visible to the naked eye.
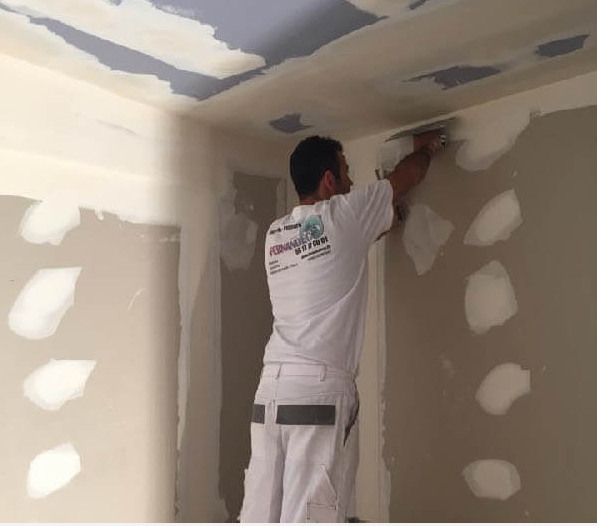
The application of plasterboard joint tapes must be done according to the rules of the art to avoid creating imperfections as well as roughness. The operation contributes to the success of the finishing of wall coverings.
Besides that, calico tapes are used to hide holes or cracks in a ceiling or wall. After cleaning the crack, you fill it with a paste filler on which the calico will be applied.
Using a filling knife, smooth the surface to conceal the self-adhesive plasterboard tapes or calico tapes. These will be embedded in the filler and remain invisible on the outside.
What are the different types of calico available on the market?
Several categories of calico can be found in stores. Many people prefer kraft paper calico tapes. They are practical to use. This type is recognized by the vertical groove in the center preventing the formation of air bubbles during their application.
As for self-adhesive plasterboard tapes, they are favored for their ease of application. That is why they are suitable for any weekend handyman. With this material, there is no need to apply filler, as it sticks directly to the wall.
Besides the non-woven plasterboard joint tapes, kraft paper or nylon, there are fiberglass plasterboard joint tapes. It is a mesh tape distinguished by its strength. It is not surprising that it is widely used by professionals.
For sharp angles, reinforced plasterboard tapes offer better results. They are notable for their steel structure.
Kraft paper joint tapes, reinforced plasterboard tapes, adhesive plasterboard tapes or nylon fiberglass plasterboard joint tapes, each category has many interesting advantages.
How to choose the right type of calico for my project?
As we just mentioned above, there are many types of plasterboard joint tapes on the market. This variety of models may complicate your selection. To avoid choosing the wrong material, it is recommended to consider its use.
As a general rule, kraft paper joint tape is better suited for making joints in partitions and ceilings. With their 50 mm width, they perfectly cover the tapered edges of plasterboard sheets.
For wall corners, favor reinforced plasterboard tape. They help reinforce the strength of the work. Despite their robust finish, their application is a breeze. The material can bend very easily.
When choosing plasterboard joint tapes or plasterboard joint tape, also consider your technical skills. If you are a professional plasterboard installer, you will have no difficulty proceeding with the application of fiberglass plasterboard joint tape.
On the other hand, if you are not skilled in this operation, opt for an easy-to-fix model such as self-adhesive plasterboard tape. With this element, you do not need to apply a coating since it sticks firmly to the wall.
Steps for applying a joint tape
Applying a joint tape is a simple operation but requires precision to obtain strong and invisible joints between plasterboard sheets. Here are the main steps to follow:
- Prepare the surface: dust off the boards to remove any traces of dust or residues.
- Apply a first coat of filler: lay down a thin, even layer in the gap between the boards.
- Place the joint tape: position the tape on the still wet filler, centering it well.
- Smooth the tape: smooth with a filling knife to remove excess and avoid air bubbles.
- Apply a second coat of filler: cover the tape, integrating it perfectly into the surface.
- Let dry: wait the necessary time before sanding.
- Lightly sand: smooth the joints to obtain a uniform finish before painting or covering.
What tools and materials are needed to apply joint tape?
Just like installing PVC, aluminum, or wood windows, it is essential to have the right tools to successfully carry out the application of joint tape.
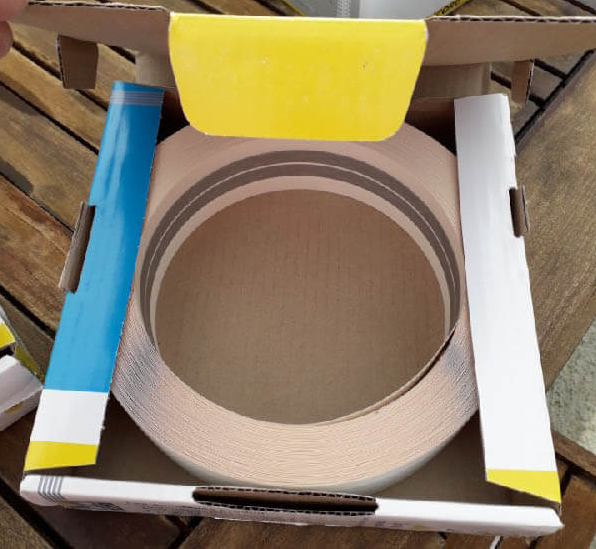
The roll of plasterboard joint tape is on the primary list. Do not hesitate to favor quality models, even if they often cost more. They promise efficiency and durability.
A filling knife is also very useful, especially for smoothing the surface. If you do not have one, use a spatula.
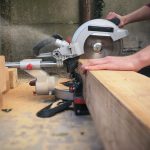
That said, you will need a trowel and a large sponge. For sanding, you are not obliged to look for a plasterboard sander. Sandpaper will do the job.
To keep the area clean, use a protective tarp or a large sheet covering the floor. Don’t forget to equip yourself with a mask during the work. Also, protective gloves help limit possible injuries to your hands.
How to prepare the joints between plasterboard sheets before applying the joint tape?
If you want excellent results, the preparation step must not be neglected. If there is furniture in the room, start by protecting it. Simply cover it with a protective tarp.
Once done, now rinse the sponge with water. Once well wrung out, use it to dust off the joints. The goal is to remove anything that reduces the adhesion of the plaster.
Then take the calico strips and cut them to the right length. Using a trowel, proceed to apply the plaster. Spread it evenly to obtain a smooth surface.
Once this phase is finished, you can apply the plasterboard joint tape onto the plaster using a spatula. It is also possible to use two plaster knives. The first is used to hold the calico. The second allows you to smooth the surface while unrolling the tape.
Once the latter is well applied, now apply the smoothing or filling plaster on top. After drying, sand the surface until it has no roughness. All that remains is to apply a coat of paint of your choice.
What is the appropriate technique to apply calico on joints and corners?
The application of calico strips on corners is similar to that of classic plasterboard joint tape. The difference lies in the types of joint tapes used. It is recommended to favor reinforced plasterboard tape for room corners or protruding angles.
To ensure their application, start by plastering the corners from top to bottom. Then fold the reinforced plasterboard tape preferably at 90 degrees. Then place them on the plaster, making sure to avoid folds or air bubbles.
Several passes with a plaster knife spatula are useful to make the calico adhere in the corner. The final phase is to apply a second layer of plaster to conceal level differences. This also removes excess plaster from the calico strips.
How to avoid the formation of bubbles or folds when applying calico?
After the application of plasterboard strips, bubbles may form between the plaster and the surface. Fortunately, it is quite possible to prevent their appearance.
In most cases, these issues are due to poor preparation of the plasterboard joint strips and the surface that will receive them. Each operation requires special attention to avoid potential problems.
During preparation, it is necessary to thoroughly dust off the kraft paper joint strips or self-adhesive plasterboard strips with a slightly damp sponge.
After they are cut to the ideal length, they must be plastered and the surface smoothed as best as possible to level it. To remove folds and bubbles, press down with a plaster knife.
To avoid these imperfections, it is also recommended to use kraft paper calico strips. With the micro-perforations present, they prevent the formation of air bubbles during the application of calico strips.
How many layers of plaster should be applied over the calico?
Most of the time, two layers of plaster are sufficient to apply on self-adhesive plasterboard strips or nylon fiberglass plasterboard joint strips. But some DIYers choose 3 layers to optimize the final results.
The first is applied during the application of calico strips. The second is called a filling layer used to hold them firmly in place. As for the last, it is a finishing layer.
Before applying the second coat, the first must be completely dry. The use of a putty knife spatula is strongly recommended. Try to avoid folds as well as air bubbles each time you coat the kraft paper calico or self-adhesive strips.
How to sand the joints after applying the calico to obtain a smooth surface?
The calico strips, also known as plasterboard joint strips or simply plasterboard strips, are a special paper installed between two plasterboard panels.
Their main functions are to join these elements together and especially to bond them in order to strengthen the wall or partition.
After their application, it is crucial to sand them to obtain a very smooth surface. This step can be essential because the final quality of your work depends on it. If you do not do it, the finishing paint may not adhere to the surface.
Sanding is child’s play, but it is messy. You should cover the floor with a protective tarp before starting this task. Also, remember to ventilate the room well. Likewise, wear a mask.
Normally, sanding the calico strips is done dry. Use very fine-grain sandpaper making circular motions.
Be sure to check the result to spot any irregularities. If the work does not satisfy you, continue sanding until the wall appears ultra smooth.
What common problems or mistakes should be avoided when installing calico?
Although installing plasterboard joint strips is not a complicated operation, mistakes can sometimes be made unintentionally.
The most frequent case concerns the choice of materials and tools. Some people opt for kraft paper calico strips to make corner joints of partitions. However, reinforced plasterboard strips are the most recommended.
| Common mistakes | Possible causes | Recommended solutions |
|---|---|---|
| Air bubbles under the calico | Poor smoothing or excess filler | Smooth the strip with a putty knife, remove the excess |
| Cracks in the joint | Too rapid drying or insufficient filler | Apply two coats of filler and respect drying time |
| Strip detached | Poorly dusted surface or dry filler | Redo the area: clean, apply filler again and reinstall the calico |
| Visible thickness | Too much filler or insufficient sanding | Spread the filler evenly and sand more carefully |
| Poor paint adhesion | Neglected sanding or remaining dust | Thoroughly dust off and apply an appropriate primer |
To smooth the surface, nothing beats using a good putty knife spatula. And for sanding, only sandpaper with finer grains provides excellent results.
The most common mistake is also related to impatience during the drying of the filler. It is imperative to respect the drying time of the product, which is often indicated on the packaging.
Others sand while the surface still seems damp. It is no surprise that the result turns out disappointing.
It is recommended to use a joint compound specifically designed for plasterboard. This type of compound offers good adhesion, a smooth finish, and makes sanding easier.
The drying time varies depending on conditions (temperature, humidity, thickness of the compound). Generally, you should wait between 12 and 24 hours before applying the second coat or sanding.
You will need: a putty knife (small and wide), a joint compound tray, sandpaper for sanding, and of course the joint tapes. An electric sander can also be useful to save time.