
Whether in the kitchen, bathroom, or living room, the interior of a house often lacks brightness. We are thus forced to keep the lighting system on constantly, even during the day.
To save energy, installing a light well is a valuable aid. This idea allows natural light to spread throughout the house.
It offers countless advantages. Moreover, it is quite possible to make a light well without difficulty. You just need some DIY knowledge and also some understanding of lighting fixtures.
The key takeaway: I consider the light well as the most poetic and effective solution to transform a windowless room into a vibrant living space. In my opinion, capturing zenithal light offers a clarity that even the best lateral opening cannot match. I find the “light conduit” version particularly ingenious for complex renovations, as it allows passing through attics without modifying the load-bearing structure. In my view, it is a project that demands absolute rigor on external waterproofing: because the slightest roof infiltration can ruin all the comfort benefits provided.
But before getting to the heart of the matter, it is appropriate to provide you with a definition of light well to help you better understand the concept.
What is meant by a light well
This installation is gaining ground in modern home interiors, regardless of style. It is an ingenious system that brings light in the most natural way into the illuminated room. The light well solution collects natural light using a tube generally made of PVC.
To capture roof light, the device must be placed high on the house’s roof covering. For the light well installation to fulfill its role, you need to find a very sunny spot.
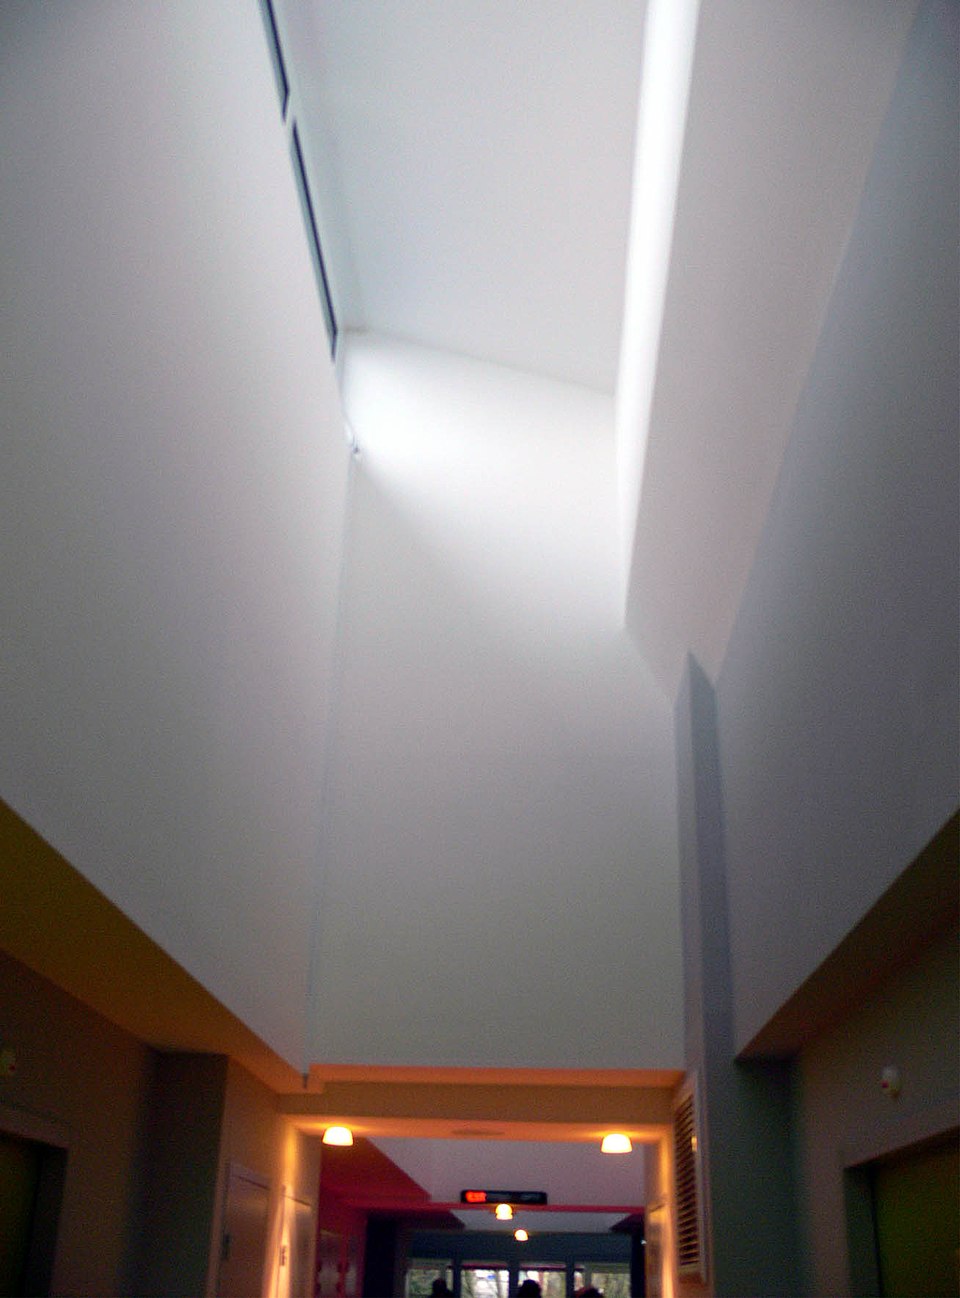
During the renovation of my central bathroom, I was frustrated by this bunker-like atmosphere that forced me to turn on the electricity in broad daylight. The realization was radical the day I finished installing a reflective light tunnel. When removing the final protective cover, the room was flooded with such natural light that I instinctively looked for the switch to turn it off. That day, I understood that daylight has an irreplaceable color temperature. However, I also learned that careful thermal insulation around the dome is vital: without it, the light well becomes a real thermal bridge that promotes condensation in winter. This experience taught me that light should not enter at the expense of heat.
Many people confuse it with a skylight or a roof window. If you are among them, the following section will help clarify things.
Roof light well or roof window
Whether it is the first solution or the second, they allow natural light to enter the house. They ensure the residents’ living comfort. Even better, they help them reduce their energy consumption.
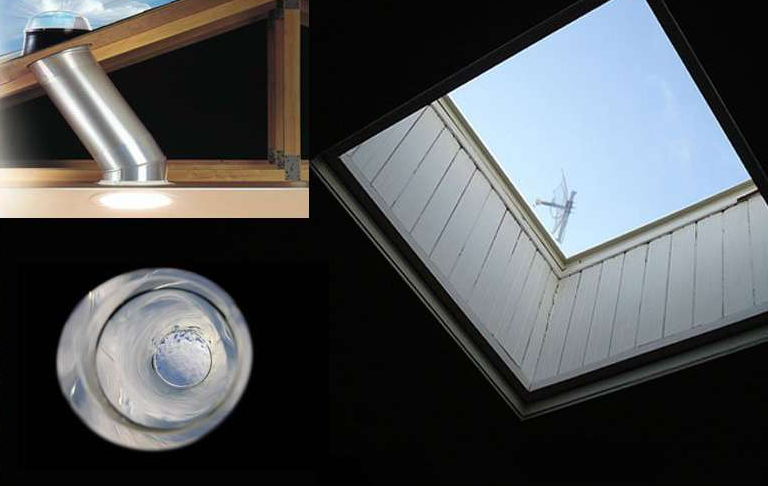
The light well window or light well roof is distinguished by its flat installation. The system therefore has no opening. On the other hand, the roof window, as its name suggests, is a window pierced in the roof. It allows both the diffusion of natural light and the ventilation of the illuminated room.
According to this passage, this second idea presents an advantage. But it still does not surpass the strengths of the light well to illuminate a room.
If you plan to build a light well, know that this system ensures lighting of parts far from the roof. If you use it to illuminate the attic, the brightness can pass through the floors. Conversely, the light from the roof window is limited to one place in the illuminated room.
But that’s not all, the light well price can seem more affordable than that of the Velux. If you hire a professional, its installation costs between €200 and €400. As for the roof window, count between €300 and €800.
Building or installing a light well does not require a building permit. You do not need to submit a work request. Conversely, the installation of the roof window or the Velux requires compliance with legislation. You must declare it to the town hall.
Technical table of light well solutions
| Type of device | Operating principle | Main advantage | Installation complexity |
| Roof window (Velux) | Direct glazed opening | View of the sky and ventilation | High (framework) |
| Light conduit | Reflective tube + diffuser | Passes through unused attics | Moderate |
| Roof dome | Acrylic or polycarbonate dome | Ideal for flat roofs | Medium |
| Masonry light well | Vertical hard opening | Strong architectural aesthetics | Very high |
| Glass bricks | Insertion of translucent walls | Privacy preserved | Simple (partition) |
Principle of light wells
Just as its name suggests, this lighting system is the result of constructing a well. But it is not a water point, because the light well requires an opening in the roof.
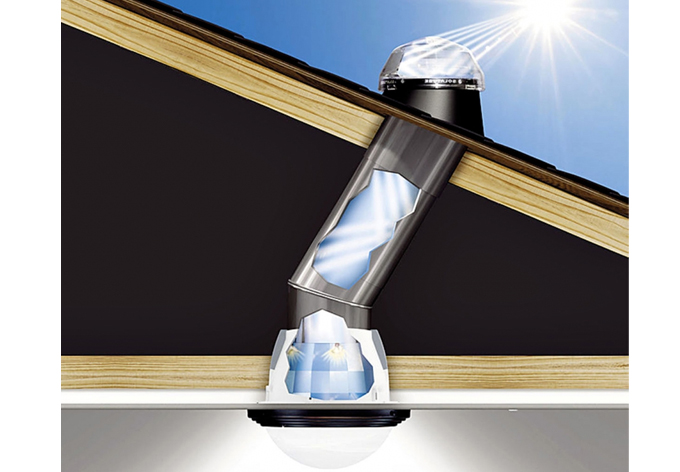
This arrangement aims to combine a fluorescent tube equipped with mirrors and a double-walled diffuser. Also called a dome or cupola, the sensor is positioned on the roof. It captures and recovers every ray of sunlight.
The objective is to concentrate and propagate natural light from the roof to an illuminated room which is often dark.
In many cases, this room can be an attic, a basement, a dressing room, a stairwell, a corridor, a bathroom, a warehouse, a garage, or other rooms without openings. If the light well roof window has been hugely successful in recent years, it is because it has several advantages.
Compared to artificial lighting, the idea is both ecological and economical. The light well system is non-polluting. Its manufactured light requires no use of electricity. Thanks to it, your energy bill is considerably reduced. Besides that, natural lighting is beneficial for health. It preserves the well-being of the whole family.
Not only does daylight improve mood, but it also ensures better sleep. Likewise, it is very useful for indoor houseplants. As mentioned above, the light well price is reasonable. Its installation requires only minimal work.
Many people prefer to make wells themselves to limit expenses. Once the setup is finished, it adds an aesthetic touch to a lit room. The light well roof window contributes to visual comfort. It makes your bathroom a relaxing place.
Step by step for making a light well
To benefit from natural lighting in your kitchen or bathroom, do not hesitate to opt for the installation of a light well.
Although the idea does not require a significant budget, it is also possible to make a light well on your own.
| Steps | Description |
|---|---|
| 1. Choose the location | Identify a very sunny area (avoid poorly exposed sections) to fully enjoy natural light. |
| 2. Gather the materials | – PVC tube (diameter adapted to the room size): 375 mm for 10 to 20 m², 530 mm for 20 to 25 m².- Roll of aluminum adhesive tape.- Tiled roof.- Cutting and fixing tools.- 2 wooden supports.- Possible solar lamp to reuse as a porthole. |
| 3. Cut the tube | Cut the PVC tube to the necessary diameter for installation. |
| 4. Apply the aluminum adhesive | Remove the protection, slip the adhesive inside the conduit without creasing it, then stick it to line the entire inner wall. |
| 5. Fix the tube | Install 2 wooden supports between the rafters to hold and clamp the tube in place. |
| 6. Install the porthole | Reuse the inside of a solar lamp (if available) and adapt it as a porthole for the light well. |
Before you start, it is crucial to determine its location. Try to identify a very sunny area in order to fully benefit from daylight.
Since the light infiltrates the tube and then floods the interior of the house, you should not install it in a section poorly exposed to the sun.
Once its location is identified, think about gathering all the necessary tools and supplies. The main material recommended is a PVC tube.
This plastic element is not only used for water drainage. You can also use it to channel natural lighting throughout your interior.
Its size depends on the dimensions of the lit room.
If your bathroom or kitchen measures between 10 and 20 m², you will need a tube with a diameter of 375 mm. A room between 20 and 25 m² requires a tube with a diameter of 530 mm.
Besides that, you also need a roll of aluminum adhesive tape. This is prized for its high heat protection. Also use a tiled roof for the covering.
When you have all the tools at your disposal, start by cutting the tube to the desired diameter.
Then remove the adhesive protection. Slide it inside the duct without crumpling it. Once this step is finished, glue some to cover the inside of the PVC.
To hold and secure the latter, install 2 wooden supports between the rafters. If you have an unused solar lamp, remove the inside and use it as a skylight for the light well.
How to install a light well?
Contrary to the idea of a DIY light well, its installation requires the help of a professional. Their intervention guarantees quality and durability.
After their services, you will have nothing left to fix since the well will immediately fulfill its roles.
To proceed with its installation, start by cutting the ceiling. Now install the dome. Its mission is to capture the lighting.
Remove the tiles and position the dome on the roof, orienting it to the West or South. Then firmly attach it to the roof using flashing that ensures watertightness.
Once this device is well fixed, the next step is to install the tube. This tube collects the light from the dome, then reflects it. Secure it firmly with two battens between the rafters.
The final phase is to attach the diffuser. Do not hesitate to use the right DIY tools to achieve reliable results.
It should be noted that there are 3 types of light wells. The installation depends on the system category. The fixed light well is the simplest model to install. It is placed in the ceiling and does not open.
The ventilated light well is considered the most sophisticated model. This one can be opened.
To activate it, you use a crank or remote control. Some next-generation wells close automatically at the first sign of a raindrop.
The last category concerns the tubular light well. It has the advantage of being adjustable. You can direct it in the desired direction.
How to insulate a light well?
Insulating this natural lighting system is not complicated. You just need to use the best products that can serve as insulation layers.
Specialists choose expanded polystyrene panels for their insulating performance. During installation, leave a space of at least 30 mm between the roof and the insulation.
To optimize insulation, it is recommended to add two layers of expanded polystyrene foam. Please glue them firmly and screw them so they do not move, regardless of weather and heat.
Besides roof window light wells, there are other solutions to bring more natural light inside the house.
The glass roof is an interesting idea to fill the darkest parts of the house with natural light.
Just like transparent glass tiles and light pipes, this project requires money and time. But it saves you from installing several artificial lights.
All about the manufacturing and installation of a light well
The location of a skylight must be chosen carefully to maximize natural light intake. It is recommended to identify a very sunny roof area, as the light is captured outside and then transported inside via a tube. Installing the device on a part that is poorly exposed to the sun will significantly reduce its effectiveness.
To make a skylight, you will mainly need a PVC tube, the diameter of which will be chosen according to the surface area of the room to be illuminated (for example, 375 mm for a room of 10 to 20 m², or 530 mm for a room of 20 to 25 m²). You should also provide a roll of aluminum adhesive tape to reflect light, a tiled roof for the covering, and possibly a porthole made from an unused solar lamp.
After determining the location and gathering the tools, start by cutting the PVC tube to the desired diameter. Then apply the aluminum adhesive inside the conduit to optimize light reflection. Attach the tube using wooden supports between the rafters, then install the upper part on the tiled roof. Finally, mount the porthole or glass/plastic cover to allow light to enter while ensuring waterproofing.