The creation of a concrete screed is common during renovation work or house extension. It is a layer of mortar used to cover a concrete slab in order to proceed with the installation of a floor covering.
Generally, this material is necessary to correct flatness and slope defects. It also allows for the embedding of pipes or ducts of an underfloor heating system.
Many use it to level a surface. When you do a leveling or smoothing, it is similarly of undeniable usefulness.
If you want to learn how to make a concrete screed according to best practices, this article provides important details on the subject.
📋 Key points: Personally, I consider that successfully making your screed is the crucial step to ensure the longevity of a floor, because a flatness defect of only 5 mm can ruin the installation of tiles. It is a technical operation but accessible with rigor. Proper dosing and patient smoothing are the secrets to a professional result.
What are the steps to make a concrete screed? What type of concrete should be used to make a screed?
To make screed mortar, you can use CEM I, CEM II/A, CEM III/A, and CEM V/A cements. Besides that, you need hydraulic binders, sand, admixtures, fibers, and of course water.
Start by cleaning the substrate then let it dry for a full day. Next, define the screed thickness. Then calculate its quantity. To do this, multiply the surface area of the screed by its thickness. The value is expressed in cubic meters.
⚠️ Warning
The most common mistake is making a mixture that is too liquid. A “soupy” mortar cracks when drying. It must have the consistency of damp earth: it should clump when squeezed in the hand.
| Step | Description | Practical advice |
|---|---|---|
| Substrate preparation | Clean and dust the surface. Check flatness and absence of cracks. | Apply a bonding primer if the substrate is porous or old. |
| Zone delimitation | Install level guides and expansion joints if necessary. | Use a laser level to ensure perfect flatness. |
| Concrete preparation | Mix cement, sand, and water according to the dosage adapted to the screed. | Use S4 or S5 type concrete for good fluidity and ease of application. |
| Screed pouring | Pour the concrete onto the surface following the level markers. | Work in successive zones to avoid visible joints. |
| Leveling and smoothing | Use a mason’s screed to draw the concrete and level it. | Finish with a trowel to obtain a smooth and homogeneous surface. |
| Drying and curing | Let the screed dry for 24 to 48 hours depending on climatic conditions. | Protect the surface from wind and direct sunlight to avoid cracks. |
| Finishing and control | Check flatness, hardness, and absence of defects. | Wait for complete drying (up to 28 days) before installing the floor covering. |
| Type of concrete | Recommended use | Characteristics |
|---|---|---|
| Traditional concrete | Base screed for indoor floors | Classic mix: 1 volume of cement, 2.5 volumes of sand, 0.5 volume of water |
| Self-leveling concrete | Fluid screed for large surfaces or underfloor heating | Very good flatness, quick application, shorter drying time |
| Fiber-reinforced concrete | Screed subject to mechanical or thermal stresses | Reinforced with metal or synthetic fibers, better resistance |
| Lightweight concrete | Screed on wooden floor or upper floor | Less dense, reduces loads on the structure, good thermal insulation |
Once you achieve the right thickness and appropriate volume, you can prepare the floor. The concrete screed can be poured directly onto the substrate. But for better results, it is better to use a separation layer.
An insulation layer under the screed is perfect for a floating screed while a resin or adhesive works well with an adherent screed. This product promotes the adhesion of the material.
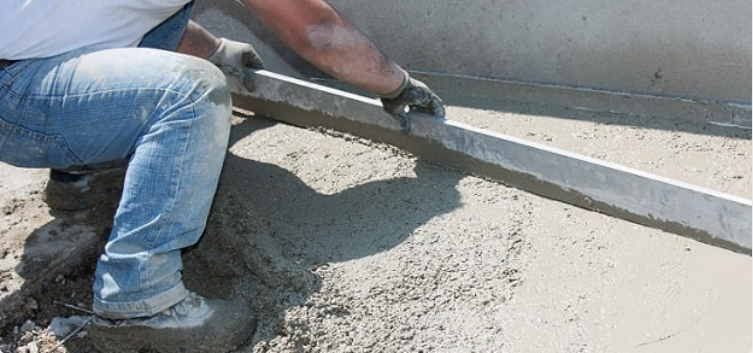
Once this step is completed, now lay the welded mesh. As soon as it is properly installed, pour the screed. To spread it, do not hesitate to use a metal screed which is placed on the guides.
This tool is also useful during finishing. It helps you smooth the screed. Also, use a trowel. To finish, don’t forget to check for hollows. The surface must be perfectly flat.
🗣️ My experience: During my first 20m2 screed in 2022, I underestimated the drying speed in hot weather. I had to rent a concrete grinder the next day to fix irregularities. The lesson learned is to always work in pairs and to protect the substrate from drafts.
How to prepare the surface before pouring a concrete screed?
- Support verification: First, it is crucial to check the condition of the substrate. Generally, acceptable surfaces include slab on ground, poured slab, solid slab, concrete floor, floor made of hollow-core slabs, and many others.
- Flatness control: Second, examine the flatness of the ground. In case of anomalies, you are advised to carry out an intermediate work such as leveling. This is a lean screed that helps you obtain a flat surface.
- Preparation for adherent screed: The preparation of the floor also depends on the type of screed. For an adherent version, ensure that the substrate is dry, sound, cohesive, and free of products that could harm adhesion.
- Application of slurry: To improve this, apply a slurry made of bonding resin and cement.
- Preparation for separated screed: A separated screed requires the installation of a compressible strip of 3 to 5 mm around the perimeter. It starts from the floor and extends at least 2 cm beyond the finished surface before being leveled.
- Preparation for floating screed: As for the floating screed, it requires the laying of a polyethylene film to prevent water transfer.
- Decoupling of walls: Just like the decoupled screed, it must similarly be decoupled from the vertical walls. To do this, it is essential to use a compressible strip.
How to calculate the amount of concrete needed to pour a screed?
(function(){if(window._alpLd)return;window._alpLd=1;var s=document.createElement(‘script’);s.src=’https://cdn.jsdelivr.net/npm/alpinejs@3/dist/cdn.min.js’;s.defer=true;document.head.appendChild(s);})()The screed can be created either using a mortar made on site or by means of a ready-to-use mortar complying with the NF EN 13813 standard.
If you do not know the cement dosage, this information is mentioned in the DTU 26.2. It notably depends on the severity of use of a room.
For low-stress rooms as an example, the average cement dosage includes 300 kg per cubic meter of dry sand. This quantity is suitable for screed mortars in living spaces.
In the case where the screed is made with a ready-to-use mortar, it must have a performance class of at least C16/F3, according to the NF EN 13813 standard.
The screed mortar is typically of firm consistency. However, it is possible to use self-leveling mortars such as fluid screed or liquid screed to simplify application.
Should welded mesh be used to reinforce a concrete screed?
A welded mesh is nothing other than a mesh made from small meshes. These consist of ultra-fine wires. Also called tiler’s mesh, this type of mesh is available in sheets or rolls.
It may seem unnecessary for fiber-reinforced concrete screed. As for the traditional screed, its addition ensures good durability over time.
Low-stress rooms also do not require a reinforcement mesh. However, it is mandatory in rooms with moderate stress.
In this same context, it must be used if a concrete slab is in place and you intend to keep it.
If its thickness is insufficient before laying a wooden floor, the use of a welded mesh is necessary. It mainly serves to reinforce the screed and extend its lifespan.
How long should you wait before laying tiles on a concrete screed?
Making a screed does not require any expensive or professional equipment like a concrete mixer. However, the drying time must be strictly respected before laying the tiles.
🌍 Did you know?
The theoretical drying time is 1 cm per week. For a 5 cm screed, you must wait about 35 days before laying a sensitive covering such as parquet.
This duration depends on countless factors such as humidity or temperature. Drying can be longer in certain regions. Moreover, it is defined according to the thickness of the concrete screed.
Let’s first talk about the traditional screed which has a thickness of 4 cm. The drying time required is approximately 4 weeks. For a screed with a thickness of 6 cm, it takes 6 weeks for the cement to hydrate.
⏱️ Timing
Once the mortar is mixed, you have about 2 hours to spread and smooth it. Beyond that, the chemical setting process makes the work impossible without weakening the structure.
How to make sure the concrete screed is perfectly flat and even?
To ensure the floor is perfectly even and flat, it is important to follow a few steps. Calculations on the amount of material needed must be accurate.
Then take good care in preparing the surface. Once this phase is finished, reinforce the screed by installing a resilient strip and a welded mesh.
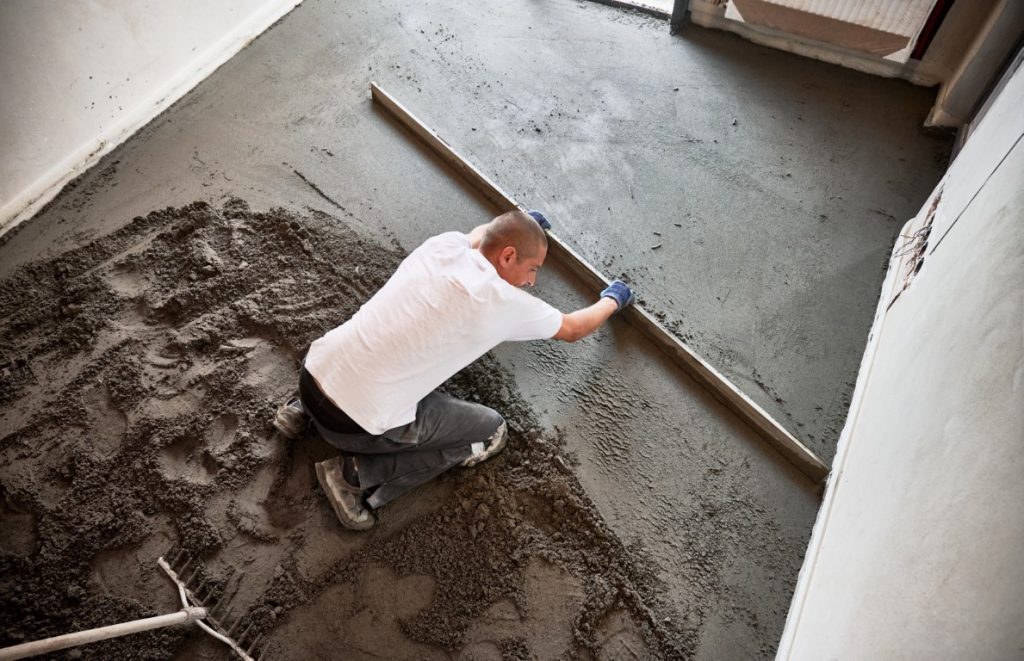
After preparing the mortar, pour the screed. Spread it using a mason’s straightedge. To achieve a flawless finish, it is important to carefully check the result with a spirit level. If necessary, do not hesitate to smooth it again.
👍 Strengths
- Perfect flatness
- Increased floor strength
- Economical for self-construction
🔍 Considerations
- Physically demanding work
- Long drying time
Frequently Asked Questions
<!– wp:yoast/faq-block {"questions":[{"id":"faq-question-1681071738452","question":"What precautions should be taken to avoid cracks in a concrete screed?","answer":"It is advisable to reinforce the material with a welded mesh. When mixing, the addition of water must be well balanced. If necessary, consider using expansion joints.”,”images”:[],”jsonQuestion”:”What precautions should be taken to avoid cracks in a concrete screed?”,”jsonAnswer”:”It is advisable to reinforce the material with a welded mesh. When mixing, the addition of water must be well balanced. If necessary, consider using expansion joints.”,”jsonImageSrc”:””},{“id”:”faq-question-1681071740267″,”question”:”How to make a liquid screed and what are its advantages?”,”answer”:”Unlike traditional screed, its consistency is more liquid. Its major advantage is the possibility of using it on high or hard-to-reach construction sites. For underfloor heating, it coats the pipes very well.”,”images”:[],”jsonQuestion”:”How to make a liquid screed and what are its advantages?”,”jsonAnswer”:”Unlike traditional screed, its consistency is more liquid. Its major advantage is the possibility of using it on high or hard-to-reach construction sites. For underfloor heating, it coats the pipes very well.”,”jsonImageSrc”:””},{“id”:”faq-question-1681071746700″,”question”:”What is the drying time required for a concrete screed before laying a floor covering?”,”answer”:”This can vary depending on the thickness of the screed. The thicker it appears, the more time it requires for the cement to hydrate. In most cases, you should allow 3 to 4 weeks of drying before laying a floor covering of your choice.”,”images”:[],”jsonQuestion”:”What is the drying time required for a concrete screed before laying a floor covering?”,”jsonAnswer”:”This can vary depending on the thickness of the screed. The thicker it appears, the more time it requires for the cement to hydrate. In most cases, you should allow 3 to 4 weeks of drying before laying a floor covering of your choice.”,”jsonImageSrc”:””}]} –>It is advisable to reinforce the material with a welded mesh. When mixing, the addition of water must be well balanced. If necessary, consider using expansion joints.
Unlike traditional screed, its consistency is more liquid. Its major advantage is the possibility of using it on high or hard-to-reach construction sites. For underfloor heating, it coats the pipes very well.
This can vary depending on the thickness of the screed. The thicker it appears, the more time it requires for the cement to hydrate. In most cases, you should allow 3 to 4 weeks of drying before laying a floor covering of your choice.